Sunday, January 31, 2010

PVC Greenhouse: Pipe Fittings


Plan your pipe fittings
I found it helpful to draw (and redraw) my proposed greenhouse. Only through this kind of visualization was I able to build my inventory list.


For this project you will need many different kinds of PVC pipe fitting. For my project it looked like

24 - 45 degree elbos 3/4 inch
4 - cross pipe fitting 3/4 inch
2 - T fittinggs 3/4 inch

24 - T fittings for 3/4 inch -1 inch
24 - 90 degree elbow 1 inch
4 - T fitting 1 inch

Remember that the T-pipe fittind along the base ahve to be "3/4 inch -1 inch T pipe fittings". This indicates that a 3/4 inch pvc pipe (the rib) will be joined to 1 inch PVC pipes (the base)

Buy a few more than you need of all sizes
They are cheap and it will allow for mistakes and adjustments along the way. Keep them in good shape and return the extras. T's are especiall helpful because you add a cross-support anywhere in your square structure where you want a bit more firmness.

Don't worry about the above counts. I will post a complete project manifest once my Greenhouse is complete


Tags: , ,

Saturday, January 30, 2010

PVC Greenhouse: The Base


Okay, so enough talk. Let's build!

The Base
The base is 10' x 5' of 1'' pipe. My PVC came in 10 foot lengths so you can layout the base with just three pieces of pipe and cutting just one 10 foot pipe in half. After the 5' lengths are cut, layout the base on the ground Use elbow fitting at the corners if you want and get a feel for the size of your new greenhouse. Visualize the amount of space it will take up and whether you plants will fit. Its pretty big using my dimension so I hope you like it. (Building is half the fun so you could just make a second one if you need more space :)


Cutting for the ribs
The 10' lengths of pipe need to be fitted every two feet with a 1" - 3/4" inch T fitting. You need to make 4 cuts in the 10 foot lengths. I wanted the sides to be nice and even. You also want the sides to be even with the ridge beam pipe. (Ridge beam is a term for the center top most beam that wooden rafter attach to in home or barn construction.)

To keep things even, I duct taped the two 1" pipes and the one 3/4" ridge beam pipe together at various point and cut them at the same time I numbered them to keep things in order. (see images)


Reassemble the base with T-fittings
Insert a 1" to 3/4 " T pipe fitting in connecting the 5 pieces of 1" inch pipe and a T fitting on each end. You'll quickly notice that these length need to end in elbows and not T- fittings if the base is ever to reform as a square. I simple cut 1" of pipe off each end and used it as a connector between the elbows and the T. So what you end up with is E-T-T-T-T-T-T-E for each long side where E=elbow and T=T.

The short sides of the base

Take the two shorter 5 foot lengths of 1" pipe and tape them together. Cut 1 foot off of each end.
Connect each piece with 1" T. You can connect these lengths to the elbows on the 10 foot lengths and you base is loosely fitted together but basically complete.

Here is how it looks with the fittings

Ignore the Ridge Beam pole in the middle. I'll cover that next.


Tags: , ,

Friday, January 29, 2010

PVC Greenhouse: Ridge Beam


Ridge Beam
Assembling the ridge beam (and rafters) was one of the most satisfying parts of this project.

The hard part:
Assembling the parts is rather straight forward. However, when it comes time to glue the parts together it is imperative that all the T's and the X's are on the same plane. In other words, the fully assembled ridge beam, together with the fittings, should rest flat when placed on a flat surface. This is key, because without the fitting laying flat on the same plane, one or more ribs, when attached, will be flying off too wide or tucked in too narrowly to be uniform. Don't worry. I provide tips down below to help gurantee your success.
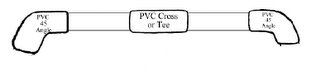
Ridge Beam:
You begin with the 3/4" 10 foot pole which is now cut into 5 pieces. Add a 3/4" T on the end of part number 1 with the pole being the center of the T. Then connect part 1 to part 2 with a 3/4" cross fitting keeping the pole straight. Connect all the other parts with cross fittings. For the last piece, cap it with a T on the end like you did for part one. The result is something that is friction fit together and looks like this:

I--+--+--+--+--I
Now let's glue the part together.
PVC bonding glue looks and smells like rubber cement you use in crafts. DO NOT BE FOOLED. When used to assemble PVC pipe and fitting it very hard after 5 seconds and rock hard and virtually unmoveable in 10 seconds. Trying to undo a glued fitting will prabably crack the fitting. So when it is time to glue, be sure and be quick.
Glue the T fitting to part one by running the PVC glue brush around the inside of the fitting and the outside of the pole. Push the two together. This one is easy. Use it to practice and get a feel for gluing PVC. Use a wood block or a 10 inch piece of PVC pipe as a hammer to really force them togther. Don't slam too hard and don't hammer aginst your wooden deck unless you want a lot of round gouges in your deck surface. ( Also, don't use a real hammer, it will crack the PVC. )
So here is how you keep all the fitting aligned while gluing
1. You now have ththe T and pipe part 1 glued together...


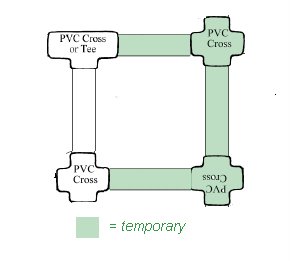
2. And you want to add a cross like the image below BUT the T and and cross have to be perefctly flat on the same plane. So...


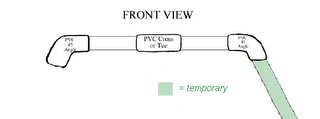
3. The strategy is called "make a square" strategy. You will connect additional pipes and crosses to the parts you will glue so that you can force them to be squarly aligned. (See image below.) All of the parts you add will just be friction fit. When you apply glue to the cross and the pipe you will have the leverage of the temporary pipe and fitings to force your glued parts into square. Your square could twist so placing it on a flat surface before the glue sets will help as well.


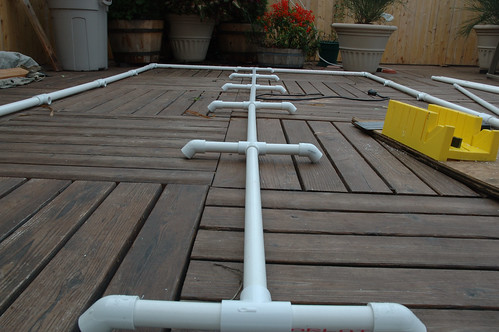
Repeat for Ridge Beam section 2 through 5 ending with a T fitting on the end of 5.


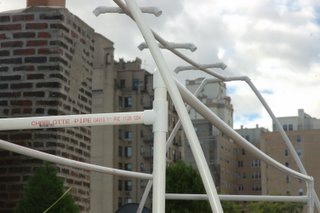
When you are done you will have this only it will be about 10' 6" long


Tags: , ,

Thursday, January 28, 2010

PVC Greenhouse: Rafters


Adding the rafters is a pretty simple step. The rafters are 4" long 3/4" piece of pipe attached to the ridge beam fittings. Once complete you will have a center support structure that looks like the image to the left.

Let's get started.

Cut 12 four inch sections of 3/4" pipe. These are your 'rafters.' You can attach and glue these to the ridge beam fittings right down the line. Use a piece of wood or pipe to really set these in tight.

This task is complete when you add 45 degree pipe fittings to each rafter. The 45 degree fitting should be pointed downwards. See image below. This is front end view of the T fitting on the ridge beam.


It is really important that 45 degree fittings are all aligned correctly. When it is time to set these with glue I recommend using a 3/4" piece of pipe in the open end to gain leverage as you twist the 45 degree elbows on. This will give you a large handle rather than just grabbing the fitting. See image below

That's it. You're done. Here's an image of the ridge beam and rafters high above my very 'in progress" greenhouse. (Only 4 ribs were attached at this point which is why it appears a bit curvy)


Tags: , ,